I was quite excited when our new MacPro arrived last week after 2 months of back order. Although it’s main use will be as an edit suite in the office I can see it becoming a regular traveller to some of the larger shows. As such I made it my job to spend some time trying various connections and resolutions in both OS-X and Windows. I had hoped it would be a quick post saying it all worked amazingly well but from initial testing those of us planning on using one (and a backup of course)  for shows will need to do extensive testing to make sure the little trashcan can do what it should.

The Machine –

  • 3.0GHz 8-Core Intel Xeon E5
  • 32GB 1866MHz DDR3 ECC – 4X8GB
  • 1TB PCIe-based Flash Storage
  • 2x AMD FirePro D700-6GB VRAM
  • OS-X 10.9.2
  • Windows 8

4K + 4K + 2k = OK

Apples promotional material mention support for up to 6x 1080 displays or 2x 4k Monitors. I unfortunately don’t have a  4k monitor to test the maximum output on let alone two but we do have a couple of bits of gear that can take some form of a 4k feed and at least indicate it’s working – in my case a Blackmagic ATEM 1M/E 4k and a Datapath X4 image wall processor.

So far I can confirm that the MacPro can handle more than just 2x 4k outputs (at 30hz) – in my case I had both outputs running at 3840×2160 and a 3rd monitor running at 1920×1080. I did load a 7680×2160 clip into Millumin and noticed some stutter but it could be to do with the outputs sub 50Hz refresh rate as the both the CPU and RAM reported low usage numbers.

This could all change with the release of 10.9.3 which has already show come quite bit improvements with both 60Hz  and HiDpi support coming to both the MacPro and 2013 rMBP.

Built in HDMI Out

Based on OS-X System Info this port is considered a Passive connection and so is considered 1 of your 2 passive connections available to use – want 2 outputs and an HDMI out? Well you’ll need an active adaptor to get them all to work. I’m also yet to get Windows to work with this port at all.

Active vs Passive Mini Displayport Adaptors

Active-Mini-DP-to-Single-Link-DVI-pig-tail-Adapter
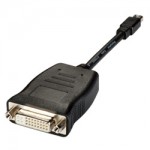
First off – Not all adaptors are created the same and if you want more than 2 outputs from a MacPro you’ll need ACTIVE adaptors. A quick eBay search shows the price difference.
Now from my experience (albeit by testing only a couple of options) not all active miniDP adaptors are the same either. I bought the cheapest active adaptors I could find and although they were fine for DVI they wouldn’t display HDMI in the right colour space in OS-X (although Windows was fine).
Also another note that all miniDP->VGA adaptors are active as they need to convert from a digital to analogue signal.

OS-X Quirks

OS-X has always been the weaker performer when it comes to GPU performance compared to Windows and even though the MacPro is a graphical powerhouse I’m still expecting the same app on either platform to perform at least 20% better on Windows.

First off – as previously mentioned – you can only use 2x generic miniDP->DVI/HDMI adaptors before you need to invest in Active adaptors. Plugging more screens won’t make any difference – they just won’t work. What’s weird/interesting is that 3+ passive adaptors will work in Windows.

MacPro Active Out ProblemNow depending on which active adaptors you have will depend on how well they work – I have two to try – the official Apple Dual Link DVI adaptor ($NZ159) and a cheaper Wieson adaptor bought for $NZ40. When connecting DVI both work perfectly – but when connecting HDMI the Wieson used a weird colour profile and was unusable. The Apple one worked no matter which connection I used at the other end.

As OS-X doesn’t support AMD Crossfire each card is considered an individual card and all connections are routed from a single card (slot-1) with the other card (slot-0) never shows anything connected (as is also the case in Windows).

Windows Quirks

The new MacPro supports only Windows 8.1 so despite me hoping to avoid that turd I’ve been forced to give it a whirl. For now I’ve only used the bootcamp gfx drivers but apparently you can also install the current AMD drivers. I’ve also enabled CrossFire so both cards should work as one.

First off – never expect your outputs to be laid out the same on reboot. What was your primary display on one boot may completely shift to another output on reboot. This is a major pain for those of use wanting things to be exactly as they just were (crazy I know). With no primary connection any port seems to be chosen at random to be your primary screen.

Even though I got 6x 1080 outputs correctly working in Windows 8.1 eventually, upon rebooting all previous resolutions were lost (except for the 2x connected monitors) and no amount of replugging order would work to get back to 1080 output being an option for the 4x feeds going into our Blackmagic 1M/E switcher. Even trying another brand HDMI->SDI adaptor wouldn’t help Windows set the output resolution to 1920×1080. 

Wrap Up

So there you have it – lots of little issues but once some bugs are fixed, hopefully soon, the Mac Pro should make for quite the playback machine for gigs that need lots of outputs from a single computer.

(LT) Quick FX Easter Egg (LT) Quick FX Easter Egg

When I made (LT) QuickFX v1.1 I not only wanted to make a FX module that only had Effects I wanted to use but also display them in a  relatively uncluttered way. Before then the best way of accessing effects was via (AT) Filter (layer) V1.6.1 which gave you a huge list of all the system plugins that Modul8 supported.

What many don’t realise is that Modul8 supports any Core Image effects that are installed – not just the builtin Modul8 or FreeFrame 1.0 plugins. As a result I could use some of the great OS once in QuickFX – CMYK Halftone and Kaleidoscope being good examples.

Of course this doesn’t just have to be system FX – any third party CI FX will show up (but not always work). One 3rd Party effect I’ve always loved is (NI) Dots. It’s part of Noise Industries FxFactory, a commercial plugin pack for NLEs and AE. I liked it so much so that I actually ended up including it into QuickFX – but never told anyone.

Dots is basically a really nice circular pixel effect which I’ve found looks great on a LED walls behind a DJ/Band. You can control Size, Spacing, Scale and Background Colour.

So. How do you access it? Well its not exactly hidden (no Konami code necessary) to access it go to the ? button and then press the DISCO.

(LT) Quick FX Easter Egg QuickFXEE04

You’ll of course need to have a copy of FXFactory installed (which is free to download). I’m unsure if it will continue to work once your trial period is over. If you do give it a try please do post what happens after the 15 day trial runs out so I can update this post.

I’ve tested this using the original v3 of FxFactory and just now on the newer v4.0.6.

I’ve updated my QuickFX module to v1.1. It adds support for (FF) RGB Offset, which is now available for free to use. A big thanks to Intrinsic for allowing me to include his plugin. The plugin is usually part of his Colmatic freeframe pack but he has graciously allowed me to include it in the module for free.
He has a whole lot of other great effects available to purchase on his website vjfx.com. Do check it out.

The module can be downloaded via Modul8’s online library and Intrinsic’s plugin can be downloaded from here: IscRGBOffset1_ub

Also – note that effects already included (Blacklight, Chromium & Smear) require Pete’s Plugins UB installed, they can be downloaded from here.

I must say I’ve very excited by Apple/Intel finally bring Lightpeak (now Thunderbolt) to market. Its a standard that should really move the whole connectivity part of computers forward.

As a video producer one of the big loses on Apple laptop line was the when they dropped Expresscard slots off 15″ MacBook Pros. We need a high speed connection that FW800 just can’t deliver – in fact we really need two – one for a RAID for content and another for either display output (not a graphics card) or for importing.
With Thunderbolt we can have up to four Expresscard speed devices running off one plug on even the cheapest unibody laptop.

Questions that I’m sure will be answered in good time:

  • Why does the new 13.3″ High end model list a 2.7Ghz i7 when the 17″ Model uses just a i7 2.2Ghz – are they different generations in chips?
  • Why do all MacBook Pros still only come with 5400rpm drives by default?
  • How long until a hub for Thundbolt comes out? How Much? I currently have to plug in Power, USBx2, FW800, Ethernet & Displayport when I get into work in the morning – I’m eager to cut this down to just power and Thunderbolt.
  • How long until updated CinemaDisplays that work as the above hub?
  • How long until iMacs are refreshed? Using Thumnderbolt the cost of a decent edit suit just dropped significantly, as just like the MBP line, as a video producer the biggest missing part on iMacs is a fast interconnect standard.
  • How long until the Mini (and all the others) are updated – weeks or months?
  • Infact more than anything – how awesome will the MacBook Air be once they add this. Its lack of ports just won’t matter.

UPDATE Engadget has more info along with some first products from LaCie and Promises – both drive enclosures – both featuring dual Thunderbolt plugs.

Now that I have my Mac Mini working seamlessly I wanted to have the normal Freeview 7 Day EPG, not just the 24hr one included in the stream. There was a handy scripted shared by Fossie on Geekzone but that was posted a few years ago and no longer works (as the geek.nz xml hosting was no longer live) so I took it on my self to fix it with the new location for the XML (now nzepg.org).

The attached Zip includes the updated script and and a compiled app of the same script. Both will do what you need to automatically download the xml.gz, uncompress and then send it to EyeTV. You can use iCal to automate it to run every week so your EyeTV is always up to date. Sweetbix.

EyeTV Freeview XMLTV Script (31kb)

In my first post I covered how to get your Logitech Harmony remote to work via a standard Mac IR port and map the buttons accordingly. In this post I show how to take those steps and use them to seamlessly let you control 2 programs from the couch.
If you’re setting up something similar you might be interested in the follow steps as it took me weeks of reading and joining the dots across many forum and blog posts.

Continue reading

Retiring my XBOX1 and XBMC setup was inevitable. It had long since shown its 733mhz CPU was able to output HD but just didn’t have the muscle to actually decode anything over SD resolution.
So when Apple announced the new Unibody Mac Mini just days before my birthday I saw it as a perfect own-gift.
The Core2Duo CPU was more than adequate to decode all codecs and resolutions and its new super thin and sexy casing was just the sugar on top. As far as I can tell its the best HTPC chassis out there – if only it had BluRay (stay tuned).
The Mini could finally give me a media centre, Freeview PVR and a rock solid *nix based NAS with the ability to run various background servers (UPnP, AirVideo, iTunes etc).

Unfortunately controlling all this from the couch was always going to require some work. OS-X’s default HTPC app, Frontrow, is extremely basic to say the least.
Thankfully there are two great applications that do almost everything, the XBMC fork, Plex and Elgatos EyeTV. Both have support for the standard Apple remote, but with only 6 buttons a lot of things were inaccessible or required weird combos to get to.

As I already owned the fantastic Logitech Harmony 725 remote I was pretty keen to get it working on my new HTPC but unfortunately Apples infrared remote implementation is very limited and only supports Apple remote controls few commands via 6 buttons.

The following steps are from my fair share of reading blogs, wikis and forums on this subject and what I’ve finally managed to figure out to get this working as I want.

Continue reading

With Seagate announced their new ‘Hybrid’ 500gb 2.5inch Drives they claimed it could offer SSD speeds but with only a small premium on top of a normal magnetic hard drive. The drives use inline 4GB flash memory and use what Seagate calls Adaptive Memory. The firmware automatically relocates frequently accessed data and stores it on the flash memory while keeping most stuff on the the drive.
Their marketing pitches substantial improvements to most general usage situations.

I was certainly intrigued. I have wanted a solid state drive for some time but its so hard to justify the cost of a decent model and the bite in storage space does make them a far off dream.
What I find interesting with this technology is that Seagate may have now found a middle ground that could become the bridging technology we all use before SSDs reach a price per gb we can accept.

Suffice to say I splashed out and ordered a couple of XT’s for the 2 MacBook Pros in our office and although I’ve only had one of them installed for mere minutes I thought people might be interested in a benchmark.

I ran AJA’s free drive speed test program on my original 320GB Seagate 7200.3 and then 500gb XT immediately after the first boot. To be clear – I have about 250gb of data on both drives which works out to be 78% of the 320gb 7200.3 and only 50% of the 500gb XT. This alone should make some speed differences.

Seagate XT Hybrid HDD vs 7200.3 HDD

I will update this with a few more impressions once I’ve given it a good going through.

The drives are available in NZ now, I got mine via Aquilatech for $232 inc GST.

Those of you who read my blogs may have seen I’m a big advocate of Apple refurbs as a good way of getting a cheap Mac.
I check the refurb page of the Apple NZ Store most weeks, always looking for a good deal for myself or for others who are trying to get an Apple as cheaply as they can. I would love to see some other Apple products turn up – check the US Refurb page – almost every product is available with a solid discount.

Now for the randomness. Today I spotted this – a refurbished MacPro for only $6199, which is only $400 above list price of $5799. I’m not sure how this price is worked out, you have to wonder sometimes……

Apple Refurb Page
Apple MacPro Refurb pricing weirdness

Apple Store Page
Apple MacPro Refurb pricing weirdness

UPDATE And then the listing magically disappears after only a few hours.

UPDATE2 Spotted this one – the best deal ever? I think not.

iPad

So after following the live blogs and now reading the tech specs I thought I’d add my thoughts on this new gadget. A few things I’ve spotted on the Apple site not mentioned in the keynote –

Screen Res is 1024×768, 132ppi (the iphone is 163ppi). Reasonable but not stellar – I would have preferred a 16:9 1280×720 panel myself but I can imagine the raw LCD costs would have made it that much more expensive. Its good so see a good screen in it though – IPS & LED Backlighting should make this look amazing in person.

VGA connector coming soon. Supports 1024×768 – making Keynote actually usable. I imagine it will work like the current iphone TVout cables – click on a video (or now a keynote presentation) and you’ll see controls on the unit and the presentation/video will come out the cable – with no OSD. No HD output (just progressive scan SD or XGA).

1GHz Apple A4 Chip
. So it would seem Apple has indeed made use of them buying PA Semi a few years back. Its an ARM based processor just like the iPhone. It’s a “system on chip” – so this one chip does it all the work. This is apparently very similar to a Tegra & Snapdragon chips – can you say ZuneHD and Nexus One.

802.11n. Good.

ePub support.
Along with PDF support we already have on the current iPhone OS this should mean we can convert text, website to a format that we can then use. I think Kindle is the only eBook reader that doesn’t support it. Go standards.

A-GPS on 3G model. The biggest Sat Nav ever?

No Phone option, new SIM standard, Data only
. I know you wouldn’t hold this to your face but a secondary speaker phone using its 3G capabilities maybe?

No Flash – Gruber @ daringfireball sums it all up well here. I don’t think we’ll ever see it on either the iPhone or iPad.

No Camera – So that means voice only skype. I think this could have become the killer app and at a low component cost – but hell they need to have something to add to the iPad 2G.

iPadNo built in USB host port, or SD card port.
Apple have announced the iPad Camera Connectivity Kit though and it does give you both of these. I had hoped the iPad would remove the need to have another computer completely making it that much closer to a netbook than an iphone. The good news is though if this puppy get jailbroken (jailbreaked?) the USB port could allow for some very interesting mods and unplanned uses.

Market – When I watched the demo video, of all the people I could think of it was my mum who I think is the most likely to get one sooner than later. My parents have been making noises about a second laptop for a while now – dad was well over having to share his computer.
My mother has never been a savy computer user and has never had to learn how to use any more than the basics of a standard OS. More and more though she wants to do the basics the iPad offers – look at pics, surf the net, email people and generally stalk her children via Facebook. I think the learning curve on the iPad is about as much tech as she can handle.

Pricing seems reasonable I’m sure someone will say “I can buy a netbook for $600” but at what I assume will be $NZ799 for the low end model, its close to the same price of a similarly spec’d netbook but with a better OS (for portable internet use), screen type and case/body.

Will I get one? Maybe. My iPhone 3GS is awesome, and I’m surprised I surf the net on it nearly as much as I do on my laptop. When I replace my laptop in the next year or so – will I get an iPad and a more powerful desktop machine? It’s something I’ve been thinking about well before the hype of this started.

No other announcments. No i5/i7 MacBookPro’s, no 12 Core MacPro’s, no new iLife. All iPad. I imagine there will be some spec bumps in the next week or so though.

One things for sure, I’m sure we’ll all pick one up and go – I want.

On another note – the iPad comes in ladies preferred options.